|
Portfolio Pastel Playtime

Portfolio
Pastels are inexpensive oil pastels which are watersoluble. Three of us
have been working (or should that be playing...) independently with the
Portfolio Pastels and we're sharing what we've done. Check it out!

Yogi
Grunwald
|

Suzanne
Cannon
(aka Quietfire)
|

Monica Black
(aka BlackCats)
|
(clicking links will open new browser windows -
if that page has a Back button, just ignore it! It won't work in a new
window. Sorry!)
Yogi's Project
©2007 Yogi Grunwald
| |
|
SUPPLIES:
|
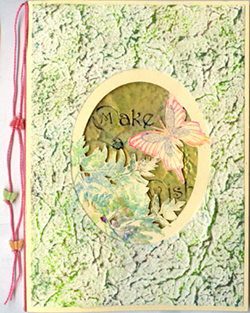
| 1. |

Front of card when inside not showing through
|
Score and fold
cardstock to get a 5" x 7"h card
Color the mulberry
paper and cut an oval that fits within your card dimensions and
that still has enough of a border around it. (keep the oval that
you just cut for the inside of the card)
Trim the mulberry
so you have an even border of the cream card showing all around.
Lightly pencil in on your cream card the location where this oval
will land. (put mulberry aside till later)
|
| 2. |
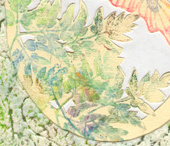 Detail of Fern Colouring
 |
Color your fern
stamp with the side of your pastels using various greens, touch
of orange and a touch of brown. Lightly mist and stamp your card
in the area where the oval will land and into the negative portion
of the oval. Do this a couple of times so you get an interesting
variety of foliage.
|
| 3. |
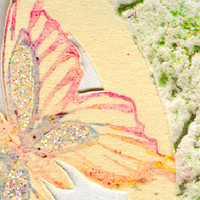 Detail of Butterfly and Textured Mulberry
 |
Color your butterfly
with some red, yellow and a touch of blue, mist lightly and stamp.
Put some glitter glue in the central portion of the butterfly and
then sprinkle with the glitter. Let dry.
Cut your smaller
oval being careful not to cut into the areas that touch your oval.
Then cut out the negative portions. Glue your mulberry paper using
the double sided tape.
|
| 4. |
INSIDE OF
CARD

|
INSIDE OF
CARD: Prepare
your oval medallion. Stamp your small butterfly with the pastels
technique from the front. Stamp your words "Happy Birthday" with
your alphabet stamp set and the Color Box stamp pad and emboss with
Pearl. Punch out your Sakura flowers, large ones from your white
mulberry paper and the small ones from some decorative scrap paper.
Put a dot of gold embossing powder or glitter in the centers of
the flowers. Glue to card with Aleene's Tacky glue.
Tie your fiber
around card and string your butterflies.
|
| 5. |

Detail of Oval Medallion & Sakura
|
TEXTURED
MULBERRY PAPER: Using the side of your pastels and all the greens
lightly skim over the textured paper, blending a bit with your finger,
then skim a few areas with the brown and blend again.
OVAL MEDALLION:
Using the clear
stamp pad, ink the whole oval well, emboss with clear, 2 or 3 times,
inking each time and letting cool between layers. Ink again and
emboss with Pearl. Ink again and emboss selectively with Pearl Gold
and clear. Final inking and Pearl embossing powder. Get your word
stamp ready, positioning it so it is visible through the cut out
of the oval, matching the position on your oval medallion (this
is an eyeball type of positioning). Before applying the final layer
of embossing powder, ink your word stamp with Staz-On black, heat
your oval and press the stamp into the hot liquid. Leave your stamp
in that position until totally cooled. Remove stamp and continue
to cool the oval weighted down with a book and a melt art mat or
other protective paper. Adhere to the inside of the card matching
the previous positioning.
|
Suzanne's Project
©2007 Suzanne Cannon
1.

|
What you will need:
Choose a page in a book you are going to alter. Glue the image
to the page with the UHU glue stick and burnish down.
|
| Begin colouring with the Portfolio Pastels in colours
that appeal to you. I went right around the image of the woman and
onto the page, building up layers. You can mix them with your fingers,
too. The pastels like being warmed up! |
|
2.

Use a 1mm Mitchell Roundhand nib without a reservoir and
write into the Pastel coating around the woman.
|
|
3.

|
Write Woman of Mystery into the Pastels. You can see the
text of the book page when the letters are scraped away.
Use your Heat Gun to heat up the large Dotted Harlequin border
and press it into the Pastels below the Woman of Mystery. You don't
need any ink on the stamp. The heat pushes the Pastels aside and
pulls it off onto your stamp. Clean the stamp after using it. Repeat
with the smaller Dotted Harlequin along the side of the page.
You will get a subtle look and a bit of hit and miss. Detailed stamps
lose quite a lot so don't expect a perfect impression!
|
Monica's
Project
©2007 Monica Black
| |
Supplies:
CUT PIECE OF
SMOOTH WHITE CARDSTOCK ABOUT 1" LARGER ON ALL SIDES THAN INTENDED
FINISHED CARD. USE PAINTER'S OR ARTIST'S TAPE TO ADHERE TO YOUR
WORKTABLE SO THAT YOU WON'T ACCIDENTALLY WRINKLE OR TEAR YOUR PAPER.
STAMP "PERHAPS
THEY ARE NOT STARS" IMAGE ON SMOOTH WHITE CARDSTOCK USING BRILLIANCE
GRAPHITE BLACK INK AND BLACK GLITTER EMBOSSING POWDER.
|
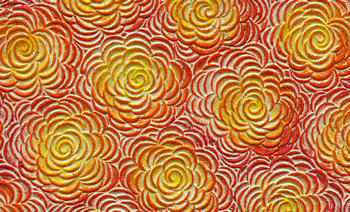
| 1. |
 |
STEP 1
USING THE SIDE TIPS OF THE PORTFOLIO PASTELS TO SCRIBBLE
ON COLORS. I USED YELLLOW, RED ORANGE, RED AND RED VIOLET FOR THIS
FIRST LAYER.
USE YOUR FINGERTIP
TO BEGIN WORKING PORTFOLIOS INTO PAPER. WORK IN A CIRCULAR MOTION,
SMOOTHING AND BLENDING THE COLORS.
|
| 2. |
 |
STEP 2 THIS
PICTURE SHOWS THE PIECE AFTER IT HAS BEEN WORKED A BIT. AFTER YOU
WORK THE COLORS IN USING A CIRCULAR MOTION START DRAWING THE COLORS
OUT IN A STARBURST FASHION WITH YOUR FINGERTIP. |
| 3. |
 |
STEP 3 ADD
MORE STREAKS OF PORTFOLIO PASTELS AS SHOWN. I USED RED, VIOLET AND
VIOLET BLUE. USE A TAPPING, PRESSING MOTION TO WORK THIS LAYER OF
COLOR. YOU WANT TO GET THE STARK LINES OUT BUT NOT BLEND THEM TOTALLY
INTO THE UNDERLYING LAYER. |
| 4. |
 |
STEP 4 ADD
THE FINAL LAYER AROUND THE EDGES USING THE BLUE PORTFOLIO PASTEL
CRAYON. WORK THIS IN USING A CIRCULAR MOTION. USE YOUR FINGERTIP
TO SLIGHTLY DRAW THE COLOR INTO THE EDGES OF THE PERVIOUS LAYERS.
ONCE YOU HAVE
ALL THE PASTELS APPLIED AND WORKED IN USE A PIECE OF WADDED UP TISSUE
PAPER TO WORK ON PIECE. START WITH THE MIDDLE OF THE CARD, WORKING
AND LIFTING EXCESS COLOR FROM AROUND WORDS. PAY PARTICULAR ATTENTION
TO THE CENTERS OF LETTERS SO THAT THE WORDS ARE MOSTLY YELLOW.
|
|
5.

|
WAD TISSUE TO
AN UNSTAINED AREA AND USE THIS TO MAKE DRAWING AND LIFTING MOTIONS
FROM THE CENTER OUTWARD IN A STARBURST FASHION. CONTINUE UNTIL YOU
ARE PLEASED WITH YOUR RESULTS. TRIM TO FIT CARDFRONT, LEAVING 1/4"
ALL AROUND. USE CORNER ADORNER INTERLACED PUNCH ON CORNERS.
MOUNT ON A PREPARED
CARDFRONT CREATED USING THE DARKEST COLOR OF THE BAZZILL MONOCHROMATIC
PACK AVAILABLE FROM QUIETFIRE DESIGN. TRACE AROUND TOP LAYER OF
CARD WITH A STARDUST GEL PEN. ATTACH TO PREPARED WHITE CARD. USE
CORNER ROUNDER ON CARD. RUB EDGES OF CARD WITH BRILLIANCE PEARLESCENT
PURPLE DEWDROP INKPAD.
CUT LENGTH OF
WHITE SILK RIBBON. PLACE OVER SCRAP PIECE OF WHITE CARDSTOCK AND
USE RED, VIOLET AND BLUE VIOLET PORTFOLIO PASTEL CRAYONS TO COLOR
THE RIBBON. SMOOTH AND RUB IN COLORS. (SAVE THE SCRAP OF CARDSTOCK
FOR FUTURE USE AS IT HAS THE BEGINNINGS OF ANOTHER BACKGROUND.)
USE SMALL HOLE
PUNCH IN UPPER LEFT HAND CORNER OF CARDFRONT, POSITIONING IT SO
THAT THE HOLE IS IN THE CENTER OF ONE OF THE PUNCHED AREAS. FOLD
COLORED RIBBON A COUPLE OF TIMES AND PINCH MIDDLE TOGETHER. THREAD
THRU HOLE FROM INSIDE OF CARD AND PULL THRU ENOUGH TO OPEN LOOPS.
WIGGLE RIBBONS
UNTIL THE TOP OF THE LOOPS ARE OVER THE PUNCHED HOLE. THREAD RIBBON
ENDS THRU THE LOOPS AND THEN GLENTLY PULL ON ENDS UNTIL THEY TIGHTEN.
DRAW FLAT SCISSOR BLADE ALONG RIBBONS TO CURL.
|
| 6. |
Preliminary Experiments
 
|
| 7. |
Colouring Embossed Paper

|
| 8. |
|
|