|
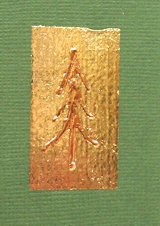
This card puts on the glitz by combining two
colours of transfer foil in one design. By using Jones Tones
Plexi glue, the design dried three dimensional! It's a wonderfu
effect, but all that glitz is hard to photograph!
|
|
Instructions:
- Cut a piece of double-sided tape about 2"
long and stick it lengthwise to the green cardstock.
Remove the release tape from the topside of the tape.
- Place the gold Transfer Foil with the shiny
side up onto the exposed sticky side of the double-sided
tape and rub with your fingers to burnish the foil onto
the tape. Don't use your nails or anything sharp as
it will leave marks in the foil. If you didn't get all
the tape covered, just move an unused part of the foil
over the exposed tape and rub.
- Partially fill the squeeze bottle with the
Jones Tones Plexi Glue and put the metal tip
on. Shake the squeeze bottle upside down. You want as
many of the air bubbles out as possible. If you aren't
doing a fine design, the tip of the Jones Tones bottle
comes to quite a narrow point and you wouldn't need
to transfer the glue.
- Squeeze your design onto the transferred foil rectangle
and allow the glue to dry. The very nice thing about
this glue is that it will dry 3D. It is dry when the
design is clear.
- Place copper transfer foil over the dried Jones Tones
Plexi glue and burnish it with your fingers. Take care
to rub the sides of the 3D design to get complete coverage
of the raised surface.
- Layer your foiled Christmas Tree on other cardstock
and paper as shown. Glue onto a prefolded card.
- Letter or stamp your greeting if desired.
|
|

