|
|
All
that Glitzes*
Artwork and scans ©2009
Yogi Grunwald
Editing by Suzanne Cannon
from the online class, October 7, 2009 at Quietfire
Creations
|
|
*links go to www.quietfiredesign.ca
each
link will open a new window. When you are finished looking at the
new page, just close it and you will return here!
|
|
|
Useful Items for working
with Glitter
|
Rubber Stamps used in this class:
|
|
Instructions
Ed Note: Yogi took a class with Haroldine Wingfield
& Deanna Pannell (originators of the Burnished Velvet Technique) in
the spring of 2009.
In her usual style Yogi then went on tangents, incorporating the burnishing
technique and expanding it with these techniques.
|
Supplies:

|
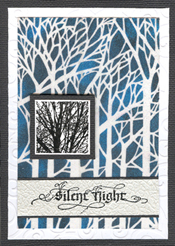
1.
Silent Night
- Cut a piece of white cardstock approx size wanted (about
1/4 larger on all sides than the stencil design area) Cover
completely with Sookwang tape.
- Use 2 pieces of 2.5" wide tape, sticking the first one down,
removing the release paper and overlapping the second piece,
so there are no gaps in the tape.
- Lay stencil (Bare Trees) on top. Randomly sprinkle the Ritz
Micro Fine glitter "Royal Blue" (lighter blue), "Blue Teal"
(dark blue), and a touch of the "Black".
- Rub and merged glitter with finger till they are nicely
blended and stuck to the tape. (don't put a lot of glitter
down - you can always add more) As you have all three colors
working together, you won't be able to put that back in the
jar. Don't forget to have a small container for excess mixed
glitters. Now this is VERY IMPORTANT. Make sure to clean the
stencil and glitter area free from ALL loose glitter. Brush
off most of it, then use a paper towel that you lightly misted
with water, to remove the rest.
- Removing Template from tape The tape is very strong
so there is a real resistance when you are removing it. Turn
stencil down with paper facing up. Peel off the edge until
you get the separation happening, then using the ruler to
keep the stencil flat, pressing down on the ruler as you gently
remove the paper.
Keep moving the ruler so it's very close to the separation
between paper and stencil until the paper is totally separated.
It will curl, but that's OK, it will be adhered to another
piece of cardstock later.
- When stencil is removed, sprinkle on Cool Highlights and
rub that in.
- Run white cardstock through the Cuttlebug with the D'Vine
Swirl.
- Trim to size and layer the glitter art onto embossed white
cardstock. Mount that onto Bazzill black cardstock the same
size as the main card (which you can't see and is white).
- For the inset: Rubber stamp the trees (Inkadinkado-Trees
& Leaves) with Versafine black and embossed with detail black
on white cardstock.
- Trim, leaving a minuscule border of white, then layer that
to the black Bazzill cardstock, then onto a piece of mat board
to raise it from the card. (Yogi doesn't like using pop dots).
- Edged the mat board with a black Zig marker.
- Rubber stamped the "Silent Night" (Quietfire Design) with
the black, and black embossed on pearlized white paper. Mounted
to the black Bazzill.
|
|

|
2.Be
Naughty
- Put a strip of 1.5"w tape in the 1/3 area of the front
of your card. There are several ways to merge and blend colors,
this is one of them: (Note: it's always easier to add more
glitter than to take away. A little goes a very, very long
way)
- Sprinkle with the orange (very similar to copper), gold,
stardust and a bit of warm highlights between the colors,
merge, blend. Watch how the colors are forming. Push a color
into the area if it's not doing what you want.
- Burnish well. (Burnish by rubbing your fingertip in a circular
motion over every inch of the glittered area until you see
the shine and it feels like a baby's bottom.) Dump the mixed
colors into a small container for backgrounds.
- Rubber stamp the image with the Versafine Black Onyx on
the card so that you'll have the sprig detail after the next
steps.
- Rubber stamp the quote with the black and clear emboss it.
Note, try to use rubber stamp images that are simple in design.
- For experienced crafters: Put
a piece of release paper on the back of Sookwang tape sandwiching
a small piece of tape where my stamp was larger than my tape.
(PS Yogi didn't have a wider tape or a sheet of tape at the
time. Sigh!!)
- Stamp image with Staz-On black. Keep
a Sharpie handy for when you accidently rub off the image.
- Cut out the main portion of the stamped
image. Note: Always try to start from dark
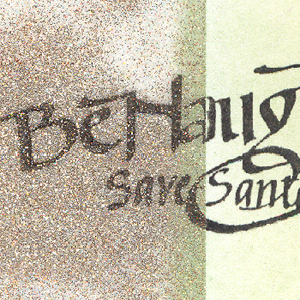 colors
to light colors - plan your work. PS Reminder: don't put
a lot of glitter down (you can always add more) colors
to light colors - plan your work. PS Reminder: don't put
a lot of glitter down (you can always add more)
- For less experienced crafters: put your tape onto
a piece of paper or cardstock and a piece of tape on the back,
rubber stamp your image and cut out the main portion of the
stamped image. I run my Sharpie over my stamped image on the
release paper to make a thicker line so I can see where to
cut to create an outline.
- With the x-acto knife, cut into the release paper making
sure you don't cut through your tape and lower layers. Cut
on the inside of the thicker Sharpie line to form a border
or outline of your stamp.
- Remove the release paper of this outline. Sprinkle with
the black glitter and burnish well. Wipe with a damp paper
towel to remove excess glitter that wouldn't go back in the
container. Your release paper has to be spotless or it will
contaminate the rest of your design. Remove the release paper
from the leaves and sprinkle green with touches of red. Yogi
tries to always incorporate the colors from surrounding flowers
or berries into the leaves. It unites them. Burnish well.
Clean well.
- Remove release paper from the berries and sprinkle a touch
of cool highlights and then some red. Burnish etc.
- Now comes the fun part for the experienced crafter, when
you remove the release paper
 from
the back, watch out - it will stick to anything. So carefully
place it onto your card. For the less experienced crafter,
there is no problems. Just remove the release paper from your
paper or cardstock and place in appropriate area of design.
So you ask, why don't the experience crafters do the same
thing. Well a skin is almost invisible to detect, whereas
the paper or cardstock will leave a step in the artwork. from
the back, watch out - it will stick to anything. So carefully
place it onto your card. For the less experienced crafter,
there is no problems. Just remove the release paper from your
paper or cardstock and place in appropriate area of design.
So you ask, why don't the experience crafters do the same
thing. Well a skin is almost invisible to detect, whereas
the paper or cardstock will leave a step in the artwork.
|
|
|
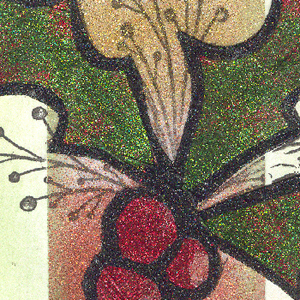
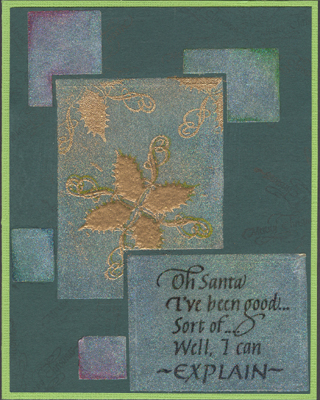
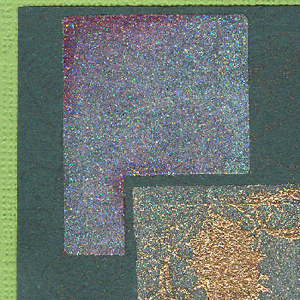
3. Oh
Santa
- Rubber stamp the Merry Christmas Snowflake randomly on the
dark green cardstock with the VersaMark stamp pad. Heat set.
- Put release paper on the back of several pieces of double
sided tape and used Nestabilities dies to create various sizes
of rectangles.
- Trim so there is a border of cardstock showing through.
Remove the release paper backing and adhere them to the card.
See below for the layout.

- Remove the release paper from the central rectangle and
sprinkled the cool highlights. Burnish really well. With a
moist paper towel or Glitter Magnet, clean off all the surrounding
area that wouldn't go back in the jar.
- Rubber stamp the holly with the gold pigment stamp pad,
making sure to protect the surrounding cardstock. Thermal
emboss with gold embossing powder.
- Over stamped the lower leaf and gold embossed a second time,
giving it the thicker look. Be forewarned: Even though
you burnish the glitter really well, there are still miniscule
sections that the embossing powder will stick too. In this
case I wanted some of the gold embossing to merge with my
glitter. Otherwise I would have used clear embossing powder.
- Remove the release paper from the quote section, added the
glitter and burnished etc as above.
- Rubber stamp the quote with the black Versafine stamp pad
and clear embossed.
 Remove the release paper from the little rectangles, add and
burnished glitter and color with the water media and a water
brush.
Remove the release paper from the little rectangles, add and
burnished glitter and color with the water media and a water
brush.
- I used a green Tombow for the upper right and lower left,
and a Sakura red Glaze pen for the upper left and lower left
rectangles. I only put color along a portion of the edge and
corner and then moved the color around with the water brush
so that I would get definition and still keep the pure highlight
color.
- PS: You can use other water media for similar effects It's
a pity you can't see it in real life, because the glitter
shines through the color and still sparkles.
- Trim the dark green card and mount it to the lighter textured
card.
|
|
|
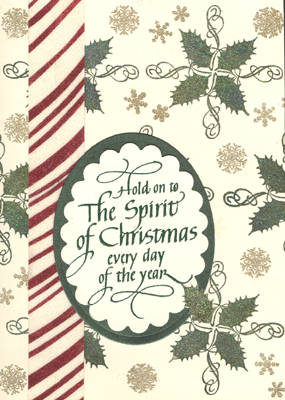
4. Spirit
of Christmas
- Place a strip of 1"w Sookwang tape onto a piece of white
cardstock. Draw design using a Sharpie black marker, then
use an x-acto blade to cut design through the release paper
WITHOUT going through the tape and cardstock.Remove
the release paper for the red glitter first. Burnished well
and clean off the strip really well with a damp paper towel
or Glitter Magnet.
- Remove the balance of the release papers and sprinkle with
"Cool Highlights".
- Trim the glitter art so there are nice neat sides. Set this
aside.
- Create a background of holly leaves using the Quietfire
Design Xmas/08 holly stamp by repeatedly stamping with Versafine
Black Onyx and embossing with Judikins "Psychedelic". Do this
all over the card front. Iridescent embossing powder would
work just as nicely.
- Randomly rubber stamped the 3 different snowflakes (Quietfire
Design Xmas/09) and gold emboss them.
- Rubber stamp the quote onto cream toned cardstock with Versafine
"Olympia Green" and emboss with Pearl Green. Die cut this
with the scalloped oval Nestabilities "Classic Scallop Oval
Large" #S4-111. Die cut metallic green paper with "Classic
Ovals Large" #S4-110.
- Mounted one onto the other. Adhered the candy cane strip,
then the oval. Lay scrap holly leaf on top of the ovals.

|
You may see all these cards on Yogi's
website with some additional images
|